Showing posts with label IBM MQ. Show all posts

Friday, 31 March 2017

Step-wise how to create remote Queue in IBM MQ

Step-wise how to create remote Queue in IBM MQ


A local definition of a remote queue is a definition on a local queue manager that refers to a queue on a remote queue manager.

You do not have to define a remote queue from a local position, but the advantage of doing so is that applications can refer to the remote queue by its locally-defined name instead of having to specify a name that is qualified by the ID of the queue manager on which the remote queue is located.

Step 1: Go to All Programs and click on “Websphere MQ Explorer”.

Step-wise how to create remote Queue in IBM MQ

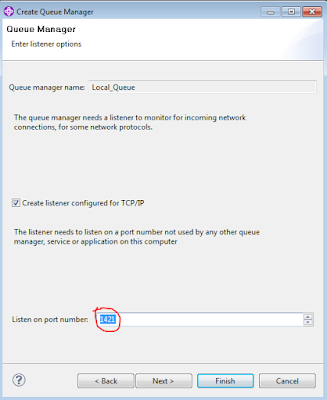
 Step 2: Right Click on Queue Managers and create 2 Queue Manager as Local_Queue and        Remote_Queue.
Step-wise how to create remote Queue in IBM MQ

Step-wise how to create remote Queue in IBM MQ

Step-wise how to create remote Queue in IBM MQ

Step-wise how to create remote Queue in IBM MQ

 Same way create other Queue manager "Remote_Queue".

Step 3: Create transmission queue as local queue under “Remote_Queue” manager. Right click on Queues and click on Local Queue.

Step-wise how to create remote Queue in IBM MQ

 Step 4: Put Name as “TRANS.TEST”. Click on Next.

Step-wise how to create remote Queue in IBM MQ
 Select Usage as “Transmission”.
Step-wise how to create remote Queue in IBM MQ
Step 5: Create sender channel as REMOTE.CHANNEL in Remote_Queue manager.

Step-wise how to create remote Queue in IBM MQ

Step-wise how to create remote Queue in IBM MQ

Pass connection name as host name and port to with we intend to connect (host name will be IP of other system or localhost and port will be listener port number of other system's or local queue manager like localhost (1421)) and transmission queue will be "TRANS.TEST". Click on finish and will get successful creation of message object.

Step-wise how to create remote Queue in IBM MQ

Step 6: Create Receiver channel in Local_Queue manager with same name as sender channel REMOTE.CHANNEL in Remote_Queue manager.

Step-wise how to create remote Queue in IBM MQ


Step 7: Create Local Queue in Local_Queue manager and click on finish.

Step-wise how to create remote Queue in IBM MQ

Step-wise how to create remote Queue in IBM MQ


Step 8: Create Remote Queue Definition in Remote_Queue manager.

Step-wise how to create remote Queue in IBM MQ

Step-wise how to create remote Queue in IBM MQ

Step-wise how to create remote Queue in IBM MQ


Step 9: Right click on sender channel of Remote_Queue manager and click on start.

Step-wise how to create remote Queue in IBM MQ

If all above configuration set correctly than sender channel will start and will change status as running. correspondingly,Receiver channel will also start.

Step-wise how to create remote Queue in IBM MQ

Step 10: Right click on remote queue in Remote_Queue manager and put some test message and check receiver queue in Local_Queue manager is receiving this message or not.

Step-wise how to create remote Queue in IBM MQ

Step-wise how to create remote Queue in IBM MQ

Step 11: Go to Local_Queue manager queue and check if this message received or not.

Step-wise how to create remote Queue in IBM MQ

Step-wise how to create remote Queue in IBM MQ


Related post:

How to install IBM MQ on windows


Friday, 24 February 2017

How to install IBM MQ on windows

How to install IBM MQ on windows


Step 1: Ask system admin to create new user and password for MQ. Add newly created user “xyz” by right click on Users with password “abc” under Computer Management.

How to install ibm mq on windows

Step 2: Create new group “mqm” and add newly created user “xyz” into “mqm” group. enter the object name as “xyz” and click on check names. Click on OK.

How to install ibm mq on windows

Step 3: Click on create. 

How to install ibm mq on windows

Step 4:  Similarly, add your system login ID (check administrator role from user account) on mqm group.

How to install ibm mq on windows

Step 5: Double click on setup.exe from installation path.

How to install ibm mq on windows

Step 6: Select No in Network Configuration option.

How to install ibm mq on windows

Step 7: Click on “Launch IBM Websphere MQ Installer” under Websphere MQ installation.

How to install ibm mq on windows

Step 8: After few seconds below setup screen will come, select below option and click on next.

How to install ibm mq on windows

Step 9: Select “Typical” option and click on next. And than click on install. Installation will take few minutes. After installation click on Finish.

How to install ibm mq on windows

Step 10: Click on Next and than again next.

How to install ibm mq on windows

Step 11: Give user name and password which is created by System admin. Click on next, if you will receive any error, kind  of user name and password mismatch ,Click on cancel and follow steps from 12 or else follow step 15. 

How to install ibm mq on windows


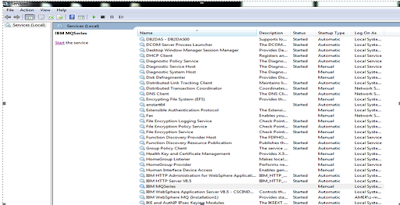
Step 12: Go to Services and find IBM MQSeries and start service.

How to install ibm mq on windows

Step 13: Find IBM WebSpher MQ(Installation X) and go to properties and under Log on option enter password(abc)of created user. or you can simply choose Local system account.Start the service.

How to install ibm mq on windows

Step 14: Go to All Programs and click on “Prepare websphere MQ wizard” and follow the previous steps from 10 and 11.

How to install ibm mq on windows

Step 15: Click on finish

How to install ibm mq on windows

I will discuss about Step-wise how to create remote Queue in IBM MQ in my next post.


Related Topic:


Wednesday, 22 February 2017

MQ Error: 2035 MQRC_NOT_AUTHORIZED or AMQ4036 or JMSWMQ2013

MQ Error: 2035 MQRC_NOT_AUTHORIZED or AMQ4036 or JMSWMQ2013


Problem: If we create a new queue manager in WebSphere MQ 7.1, 7.5, 8.0 or 9.0 or later and try to use a user id(commonly mqm for UNIX and MUSR_MQADMIN on Windows) that is an MQ Administrator to access the queue manager via a server-connection channel (remotely from another host, or locally from the same host and not using bindings mode). You get an error with reason code 2035:

2035 MQRC_NOT_AUTHORIZED

Related error codes:
MQ Explorer => AMQ4036 
MQ classes for JMS => JMSWMQ2013


org.springframework.jms.JmsSecurityException: JMSWMQ2013: The security authentication was not valid that was supplied for QueueManager '' with connection mode 'Client' and host name 'localhost(1417)'.; nested exception is com.ibm.msg.client.jms.DetailedJMSSecurityException: JMSWMQ2013: The security authentication was not valid that was supplied for QueueManager '' with connection mode 'Client' and host name 'localhost(1417)'.
Please check if the supplied username and password are correct on the QueueManager to which you are connecting.; nested exception is com.ibm.mq.MQException: JMSCMQ0001: WebSphere MQ call failed with compcode '2' ('MQCC_FAILED') reason '2035' ('MQRC_NOT_AUTHORIZED'). 

Note: The MQ Administrator can remotely access (via a server-connection channel) without problems other MQ queue managers at version 6 or 7.0.x.

Solution :  If we want the MQ Administrator to be able to access the queue manager via client channels, we have different approach to achieve:

1a. We can add the following two Channel Authentication Records:

The first rule blocks administrative users and the MCAUSER "nobody" (which prevents someone from creating a user ID "nobody" and putting it into an authorized group).
$ runmqsc QmgrName
SET CHLAUTH(*) TYPE(BLOCKUSER) USERLIST('nobody','*MQADMIN')


The second rule provides a reduced blacklist for SYSTEM.ADMIN channels that allows administrators to use these. It is assumed here that some other CHLAUTH rule such as an SSLPEERMAP has validated the administrator’s connection or that an exit has done so.


SET CHLAUTH(SYSTEM.ADMIN.*) TYPE(BLOCKUSER) USERLIST('nobody')

The above rules apply to SYSTEM.ADMIN.SVRCONN which is used by the MQ Explorer. 

If you are using another user-defined channel, such as MY.ADMIN.SVRCONN, then you need to add the following two records:
SET CHLAUTH(MY.ADMIN.SVRCONN) TYPE(ADDRESSMAP) ADDRESS(*) USERSRC(CHANNEL)
SET CHLAUTH(MY.ADMIN.SVRCONN) TYPE(BLOCKUSER) USERLIST('nobody')


Note: it is not advisable to use SYSTEM.DEF.* channels for active connections. The system default channels are the objects from which all user-defined channels inherit properties. The recommended practice is that SYSTEM.DEF.* and SYSTEM.AUTO.* channels should NOT be configured to be usable.

1b. This is a variation of (1a) but allowing the MQ Administrator to only use a particular host.

The first rule blocks MCAUSER "nobody".
SET CHLAUTH(SYSTEM.ADMIN.SVRCONN) TYPE(BLOCKUSER) USERLIST('nobody')

The second rule removes all access to SYSTEM.ADMIN.SVRCONN ...
SET CHLAUTH(SYSTEM.ADMIN.SVRCONN) TYPE(ADDRESSMAP) ADDRESS(*) ACTION(REMOVE)

And the third rule adds an entry for the server that needs access.
SET CHLAUTH(SYSTEM.ADMIN.SVRCONN) TYPE(ADDRESSMAP) ADDRESS(9.xx.xx.8y) USERSRC(CHANNEL)


1c. Disable the Channel Authentication Records feature:


$ runmqsc QmgrName
DISPLAY QMGR CHLAUTH
AMQ8408: Display Queue Manager details.
QMNAME(TEST01) CHLAUTH(ENABLED)

ALTER QMGR CHLAUTH(DISABLED)


WARNING: Disabling this new feature is not recommended for MQ 7.1 production queue managers due to security implications.
Note that disabling CHLAUTH results in a policy that accepts administrative connections by default. The administrative effort to lock down administrative access with CHLAUTH(DISABLED) is much greater than to do so with CHLAUTH(ENABLED). It is therefore recommended to leave CHLAUTH(ENABLED) and use the other security features of WebSphere MQ V7.1 to authenticate administrator connections.

How to use hermes jms in soapui for IBM MQ

How to use hermes jms in soapui for IBM MQ


I discussed on my previous post about how to configure HermesJMS in SOAP UI for IBM MQ.

Today, I am going to discuss about how we will use JMS Session which we created during configuration of hermes jms for sending/receiving messages to/from Queue from SOAP UI.

Prerequisite
  • Destinations/Queues must be created on IBM MQ and Channels are must be started if any.
  • SOAP UI must be configure with Hermes JMS. 
  • JMS session and Destinations/Queues must be defined.

In previous post, we created JMS Session and destinations as below.

How to use hermes jms in soapui for IBM MQ


Use of Hermes JMS in SOAP UI

HermesJMS is an extensible console that helps Tester to create test cases making it easy to browse or search queues and topics, copy messages around and delete them.

Step 1: Create New SOAP Project using any dummy WSDL. You can use WSDL from SoapUI tutorials.

How to use hermes jms in soapui for IBM MQ

How to use hermes jms in soapui for IBM MQ

Once, you will click OK button new SOAP Project will look like below.

How to use hermes jms in soapui for IBM MQ


Step 2: Create New Test Suite by right click on SOAP UI Project created in Step1.

How to use hermes jms in soapui for IBM MQ

How to use hermes jms in soapui for IBM MQ


How to use hermes jms in soapui for IBM MQ

Step 3: Create New Test Case by right click on Test Suite created in Step2.


How to use hermes jms in soapui for IBM MQ


How to use hermes jms in soapui for IBM MQ

Step 4: Create test steps (Type: Test Request) as necessary based on project requirement.

 For example, I will create create three Test Request steps in SOAP UI test case. One Test Request step for Receive Destination Queue to consume message and one Test Request to send request to destination queue and One Test Request step for send and receive messages.


How to use hermes jms in soapui for IBM MQ

How to use hermes jms in soapui for IBM MQ

How to use hermes jms in soapui for IBM MQ

How to use hermes jms in soapui for IBM MQ

Note: Make sure “Add SOAP Response Assertion” check box to be unchecked, otherwise test suite always fails.

Similarly, create HermesTestStep2  and HermesTestStep3. 


How to use hermes jms in soapui for IBM MQ


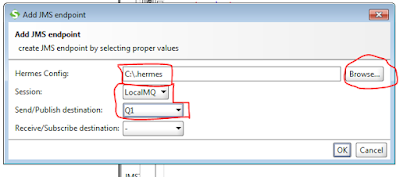
Step 5: Create JMS Endpoints for Receive and send destinations.


How to use hermes jms in soapui for IBM MQ

How to use hermes jms in soapui for IBM MQ

Step 6: Map JMS Endpoints for Receive and send destinations.


  • send only jms://LocalMQ::queue_Q1
  • receive only jms://LocalMQ::-::queue_Q2
  • send and receive jms://LocalMQ::queue_Q1::queue_Q2
How to use hermes jms in soapui for IBM MQ


For Dynamic mock response, you can write Groovy script and also can set JMS header attribute like ReplyTo, Expiration time, time-out etc.


Related Topic: